


The construction methods of the Bouzouki, as well as related instruments of the tamboura family are quite similar. We will therefore make reference to certain construction stages using the lauto as the model but it would be appropriate to apply it to the other instruments with certain specific variations. In Greece there exist countless Luthier shops usually small is size where the master Luthier and perhaps an apprentice assistant (usually a relative) produce their masterpieces. The art of instrument making then as well as now is carefully guarded and passed on from father to son. Rarely does a master release the “Tricks of the trade” to outsiders for their own reasons.
 We believe however that the art of a Luthier is a dying art that may not be around in the future due to automation and computerization. We say this with sadness, as it is evident that many of us including my self are looking for ways to produce instruments with modern machines in order to be consistent and for reasons of great ease.
I must admit however that many of the older instruments I had the privilege of repairing during my career may have had visible inconsistencies but they bared the maker’s soul, which is impossible to do with modern machines.
The sequence of constructing an instrument of the tamboura family is first the making of the sound box or SKAFOS, the making and installation of the neck or MBRATSO, the making, bracing and installation of the sound board or KAPAKI, all of which play an equally important part in the function, sound and stability of the instrument. For the construction of the SKAFOS (sound box) we use hard wood such as ebony, polysander, maple (aka SFENDAMOS in Greek, or Kelembek in Turkish), walnut and other hard woods of similar quality. Untraditional Luthiers of today are constantly experimenting with other woods that have a natural decorative appearance, such as the Australian Lacewood or purple heart wood both of which give an amazing and unusual effect once they are sanded and finished with lacquer.
The neck is made of soft wood such as lime-tree or linden tree wood, mahogany, basswood or other similar types of soft wood.
The soundboard is made of white wood with consistent and straight wood grain pattern from trees such as spruce (ELATO) or pine (PEFKO).
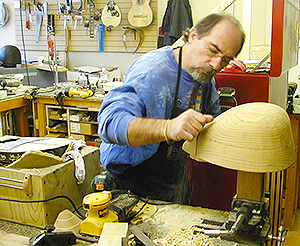
We will now get into a step-by-step explanation of the construction of each one of the three main parts, starting with the Skafos. Like we discussed earlier many of the Skafi (Sound boxes) in the old days were carved out of one piece of wood. Today however, we use a wooden mould.
At the top end of the mould we attach a cone shape piece of soft wood, which will remain in the Skafos permanently once the strips are glued in and that is where the neck will be attached. The strips or douges will also be attached to the Dakos (Hill).
The first strip is placed in the middle and it is called the Dougomana or the mother-strip. The reason being is that that first strip would be the guide to the installation of the other strips which are placed one on the left one on the right side and so on and give the Skafos its symmetric shape. The glue used in the older days was fish or hide glue. Today we also use carpenters glue. Before the strips are glued on however we use a hot iron and we bend the strips to desired shape. It is worth noting that a misconception exists as to the number of strips. For example, people believe that a 60 strip instrument is better sounding than a 30 or a 45 strip and so on. My opinion is that the number of strips is not relevant to the quality of sound. It is merely pride of ownership. I have worked on 30 strip instruments that had an irreplaceable sound. So much for this theory.
 Once the strips are glued and dried, the next step is to glue the back and sides where the strips meet. This in addition to being decorative, this serves as a form of reinforcing the strips and the Skafos in general. Once all of the glued parts are dried the Skafos is removed from the mould and a secondary hill (Dakos is placed at the back end of the Skafos. This hill is the support for the tailpiece (Hordiera), where the strings are attached. In addition, the interior rim of the skafos is lined with a thin strip of soft wood such as mahogany limewood etc, as additional support for of the kapaki.
The exterior of the Skafos as well as the interior is now ready to be cleaned of all excess glue ready for sanding. The interior of the Skafos is then lined with either strips of glue cloth or with thin metallic paper.
The reason for this is to further enforce the strength of the instrument. This material also plays an important role in the acoustic qualities. Particularly with the metallic paper as it reflects a brighter sound.
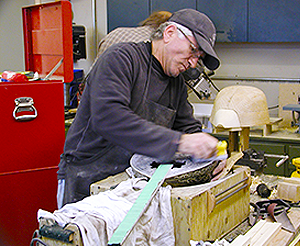
Now we set the Skafos aside, and we begin work on the neck. As we said earlier the neck is made up of soft wood as well as hard wood in the center for kondra. The hardwood used is almost always ebony and it runs the full length of the neck. This ebony strip would ensure that the neck and later the fret board would not warp or twist from the tension of the strings or climatic changes. A dovetail is cut at the end of the neck and the same size beveled mortise is carved on the dakos of the Skafos. This is one of the most critical operations, as it will dictate the precision of the neck fitting and the stability of the instrument in general.
We will now move to the soundboard. This is just as critical of a job as the rest as the sound and its quality will totally depend on the type of wood used, its thickness, its wood grain and how well it was joined together. In our earlier discussion we said the ideal soft wood to use is spruce or pine. The maker would brace the Lauto sound board with 7 braces and the Bouzouki sound board with 3 braces, spaced in accordance to standard construction principals and subject to the maker’s personal preference within reason.
The braces are given a uniform arch so that this arch can transfer to the sound board, thus making the board more tolerant to the pressure of the strings and restricting it from caving in as it is about 2mm in thickness on its completed stage.
 Wood used for the construction of instruments and in our case instruments of the tamboura family are usually left to dry for many years before they are used for construction. This would enable natural resins and moisture found in the wood to disappear. Most modern Luthiers purchase wood from exotic wood suppliers who specialize in this field. It is worth noting that modern wood suppliers kiln dry the wood, which is a process, induced by mechanical means in a kiln, which is an oven, designed specifically for this purpose. This removes all moisture and other substances found in the woods. Many Luthiers however, including my self prefer to use wood which has been left to dry naturally. A minimum drying time in my opinion is about 3 years and an ideal one would be about 8 years. Drying wood naturally does not remove all moisture 100% which is preferred as any left substances give the wood longevity and “a soul”.
In the older days Luthiers would process their wood by submerging it into water and salt for some time which disallowed the wood to crack once it was dried.
Once the sound board is braced and cut to approximate size it is then glued onto the sound-box and supported by lining which is installed around the interior rim of the Skafos permanently.
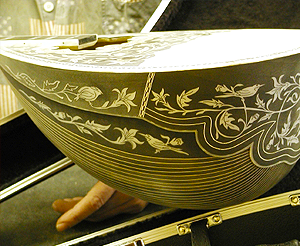
It is left to dry for many days at the Luthiers discretion and then the decorative inlay is installed. Pre-made figoura are inlaid by marking their shape onto the soundboard and carving the wood to the depth of such figoura where the figura is inlayed. The sky is the limit as to what type of design or material is used for the figoura. We use synthetics such as acetate (Plastic), abalone and mother of pearl shells, different colors of thin wood veneers, thin brass material etc, using marquetry techniques for inlaying.
The perimeter of the kapaki is lined with binding or perfling which comes in different designs and shapes.
Once the three main parts are assembled (the Skafos, the neck and the kapaki),
Secondary parts are assembled and other work is carried out in order to complete the instrument. Firstly we shape the neck in a round shape at the back so the hand could slide smoothly and we cut the neck at the top to the right size. We then install the peg head or KARVOLOS, which is joined to the neck at a slight backward angle. This is where the machine heads are installed.
In the older days they were made from ebony and they were called STRIFTARIA or KAPILIA. At this stage we sand the entire instrument with different grit of sand paper ready for receiving that lacquer finish.
 Once visible imperfections to the surface of the wood are corrected we would apply wood filler and a thin coat of lacquer to seal the wood.
Most makers would not finish the instrument totally at this point, as the lacquer finish will get damaged during the completion process. Final finish and polish would be made at the end.
The next step would be to cut the fret board to exact length and thickness and to slot it for the frets. The fret board may be inlayed with a vine inlay from mother of pearl or synthetic material. Many makers install the frets onto the board before fixing the board to the instrument. I prefer to fix the board to the neck first and then install the frets. I t gives me more flexibility in making adjustments. Once the frets are installed they now must be leveled and crowned. This is an important part, as it will determine the easy playability of the instrument.
This is where if the frets are not processed properly the instrument would buzz and the strings would be higher off the board, which would reduce clarity and speed. Once the fret board is ready, a bridge should be made and fitted to the sound board. The making of the bridge is a specialty in itself, which would need a great deal of care. If it is not made and installed properly the instrument would have an intonation problem that is irritating to the sensitive ear.
At this point a maker should string the instrument up and test it for sound, playability intonation and general feel. Adjustment would be made prior to the maker finishing the instrument with the lacquer.
The proper way to lacquer any instrument is in stages where that maker applies a thin coat of it allowing for it to dry before repeating another application.
This process should take days or even weeks, depending on the urgency of completion, the quality of instrument and weather conditions. The best times to finish an instrument would be spring and fall as the humid summers and dry winters make it more difficult to apply the finish properly, especially if the maker chooses to finish the instrument with French polish which will require a lot of elbow grease as the maker is required to apply the polish and then work it manually with a cloth ball to achieve the desired gloss or finish. The finishing of an instrument is an art of its own and in the older days as well as today there are people specializing in finishing instruments only. A maker may choose their services. We, in the industry call them the LOUSTRI.
This in a very brief description is the making of a bouzouki, laouto and related stringed instruments. It is a complicated process, which takes year to perfect, and it requires a small part of the maker should to be left with each instrument. The choosing of proper wood, combined with the skills the luthier possesses will determine the final product.
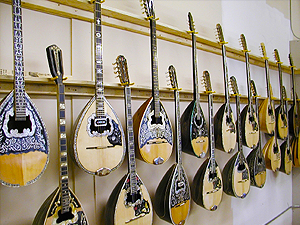
Photo Gallery


